Sometimes when life gets messy you've got to spread around a little fairy dust to make it through the day!

Wednesday, December 28, 2011

Thumbprint Cookies


Ingredients:
  • 1 1/2 cups unsalted butter, softened
  • 1 cup sugar
  • 1 tsp. vanilla extract
  • 3 1/2 cups all-purpose flour
  • 1/2 tsp. salt
  • Desired jelly (I used strawberry, apricot,  peach, and blackberry)

Directions
  1. Preheat the oven to 350F degrees.
  2. In a large bowl, cream the butter and sugar and stir in the vanilla extract.
  3. In a medium-sized bowl, mix the flour and salt. Combine the flour mixture and the butter mixture until the dough is crumbly but holds together when pinched.
  4. Take a walnut-sized piece of dough in one hand. With the thumb of the other hand, gently knead it three times
  5. Roll it into a ball and place on an ungreased cookie sheet. With your knuckle or thumb, press a well in the center and fill with 1/2 teaspoon of jelly. 
  6. Bake for 10 to 15 minutes.

Festive Chocolate Cake Balls


Ingredients:
  • 1 box Chocolate Cake mix (prepared according to the directions on the package)
  • 1/2 can pie filling (I used raspberry filling)
  • 1/2 pkg. white chocolate almond bark 
  • Festive cake sprinkles 
Directions
  1. Make the cake mix according to the directions on the package. 
  2. Using an ice cream scoop fill the cake ball maker slots to the top. Close the lid and let them bake for approx. 6 minutes. Remove them immediately to a cooling rack. Repeat until the cake batter is all gone.
  3. Meanwhile, fill a quart-size bag with the pie filling (or use the injector included with the cake ball maker). Once the cake balls are cool enough to handle, pipe the pie filling into each of the cake balls. 
  4. Using a microwave-safe bowl, melt the white chocolate bark. Dip just the tops of the cake ball into the melted chocolate. Immediately sprinkle with the sprinkles! 
  5. Let cool and enjoy!!

Chocolate Chip Cookies


Ingredients:
  • ¾ cup unsalted butter, softened
  • ¾ cup brown sugar
  • ¼ cup granulated sugar
  • 1 egg
  • 2 tsp. vanilla extract
  • 2 cups flour
  • 2 tsp. cornstarch
  • 1 tsp. baking soda
  • ½ tsp. salt
Directions:
  1. Preheat oven to 350F.
  2. In the bowl of a stand mixer fitted with a paddle attachment, cream together butter and sugars until fluffy and light in color. Add egg and vanilla and blend in.
  3. Mix in flour, cornstarch, baking soda and salt. Stir in chocolate chunks.
  4. Using a standard-sized cookie scoop or tablespoon, drop dough onto a prepared baking sheet.  Bake for 8-10 minutes, until barely golden brown around the edges.  (The tops will not brown, but do NOT cook longer than ten minutes.)
  5. Let cool, on the sheet, on a wire rack for five minutes.  
  6. Remove from baking sheet and let cool completely.  

Santa Hats


Ingredients:
  • 2 egg whites, at room temperature
  • 1/2 tsp. cream of tarter
  • 1/4 tsp. vanilla extract
  • 1/2 cup sugar
  • Red colored sugar 
Directions:
  1. Preheat the oven to 200F. 
  2. With an electric mixer, beat the egg whites until soft peaks start to form. Beating all the while add the cream of tarter and vanilla extract. Then slowly add the 1/2 cup of sugar. Continue to beat until the peaks stiffen. 
  3. Spoon the meringue into a quart-size plastic bag. Snip off the corner and pipe 2 dozen 1 1/2 inch tall Santa hat triangles onto a parchment lined baking sheet. Note: you should have 1/4 of the meringue left. 
  4. Sprinkle the triangles with the red sugar. Then use the remaining meringue to give each one a pom pom and trim. 
  5. Bake the hats for 1 hour and 20 minutes. Turn off the oven and leave the hats in it for an hour to crisp before removing. 
Here is a closer look:

Note: I do not recommend putting these on an enclosed cookie tray with the other cookies. I found that they absorb the moisture from the other cookies and crumbled. But the hats stayed in their original shape when stored in an airtight container with just these other Santa hats.

Candy Cane Cookies


Makes about 23

Ingredients:
  • 3/4 cup butter, softened
  • 1 cup sugar
  • 1 egg
  • 1 tsp. peppermint extract
  • 1/2 tsp. vanilla extract
  • 2 1/4 cups flour
  • Red food coloring

Directions:
  1. Preheat oven to 375F. 
  2. In a large bowl, cream the butter and sugar. 
  3. Add the egg and beat well. 
  4. Stir in the peppermint and vanilla extracts. 
  5. Gradually mix in the flour. 
  6. Divide the dough in half. Color one half with red food coloring and leave the other half plain. 
  7. Roll out a tablespoon of red dough and a tablespoon of plain dough until they are each 6-8 inches long. Twist then into a candy cane, pinching the ends. Repeat.
  8. Bake on an ungreased cookie sheet for 8-10 minutes.

Peanut Butter Chocolate Treats


Ingredients:
  • An even number of Ritz Crackers (I used 28 crackers but you can make as many as you desire)
  • Peanut Butter 
  • 1/2 pkg. chocolate almond bark
Directions:
  1. Take a Ritz cracker and smother with glob of peanut butter (can use chunky or smooth). Top with a second Ritz cracker - it will look like a sandwich. Repeat with remainder of crackers. Set aside.
  2. In a microwave-safe bowl, melt according to the directions on the package the chocolate almond bark. Remove from microwave.
  3. Dip the prepared Ritz peanut butter sandwiches into the chocolate. 
  4. Set on a wax paper lined cookie sheet to cool and harden. 
  5. Store in an airtight container.

Press Cookies

Holly Wreaths:

While looking around my parents pantry/storage area I came across a Mirro Press Cookie maker. Since it wasn't getting much use at their house, I asked if I could take it home and try it out. For Christmas this year I gave it a try. I used the star press plate to make some festive holiday cookies that I included on my annual cookie tray I give to relatives and close friends every year.

Here is how they turned out:


Recipe:

Ingredients:
  • 1/2 cup butter
  • 1 1/2 oz. cream cheese, softened
  • 1/4 cup sugar
  • 1/2 tsp. vanilla extract
  • 1 cup flour 
  • I added 1/2 tsp. peppermint extract as well and a few drops of green food coloring
Directions:
  1. Cream the butter and cream cheese. Add the sugar and cream well. Then add the vanilla extract (and/or peppermint extract and/or food coloring).
  2. Slowly add the flour. Mix well. 
  3. Fill a cookie press. Form cookies on an ungreased cookie sheet (I used the star press Mirro plate I held the press upright and turn it on the cookie sheet 1/4 turn).
  4. Bake in a 375F for 8-10 minutes.

Winter Crafts for Kids

Winter time means colder weather and with colder weather means more staying in doors to keep warm. What to do with all that extra time with little kiddos? At my daycare we find lots of extra crafts to do. Here are a few we've made this year:

Embellished Mitten Craft

Materials:
  • Construction paper (colors of your choosing; we chose yellow, red, purple and blue)
  • Printed recent photograph (can be in color or black and white)
  • Lid of a jar (used to trace the circle around the desired photograph)
  • Pencil (used to trace the lid)
  • Scissors 
  • embellishments (ex. sequence, glitter, fuzzy pompoms, etc)
  • glue


Construction Paper Santa Hand 


Materials:
  • Construction paper (red, pink, black, green, white)
  • Cotton balls (used for the puff on the end of the Santa hat)
  • Template (I made one using an old manila file folder)
  • Pencil (to trace templates and child's hand)
  • Scissors 
  • Glue 
  • Note: you can also use googly eyes instead of construction paper for the Santa eyes 
  • Child's hand 

How to display all this wonderful artwork??

Decorated Magnetic Clothes Pins:

Materials:
  • Clothes pins 
  • Magnetic strip (cut into smaller strips)
  • Glue gun & glue (used to glue magnetic strip onto the back of the clothes pin)
  • Pretty scrapbook paper 
  • Pencil (used to trace around the clothes pin front onto the back of the scrapbook paper)
  • Scissors (used to cut the magnetic strip and the scrapbook paper)
  • Mod Podge (used to glue the scrapbook paper onto the front of the clothes pin)
  • Paint brush

Monday, December 12, 2011

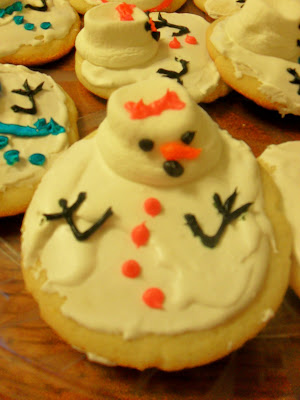
Melted Snowman Cookies

I recently become addicted, like so many others, to a website called pinternet! It gives you all sorts of ideas of DIY projects and craft ideas as well as recipes. I found these cute melted snowman cookies and decided to give them a try for a family gathering we attended this weekend. I had fun making them and they are adorable!


To make 10 cookies:

Ingredients:
  • 1 pkg. Betty Crocker Sugar Cookie Mix (and ingredients on pkg)
  • 10 large marshmallows
  • Decorating icing tubes (black, orange, and other desired colors for buttons, scarves, bows, etc)
  • Royal Icing ingredients: 1 egg white, 1 1/2 cups powdered sugar, 1 tsp. lemon juice (makes 2 cups)
Directions:
  1.  Mix cookie mix according to pkg directions. Grab a chuck (about golf ball size) and squish it down using the palm of your hand until its about 1/4 inch thick. The lumpier or misshaped the better! Bake according to the directions on the pkg. 
  2. Remove to a wire rack and let cool.
  3. Make the royal icing: combine the egg white and sugar, whip with an electric mixer for 5 minutes. Add the lemon juice, mix again for 3 minutes. 
  4. Slather the royal icing over the top of the cookie. Spread it around with the back of a spoon or rubber spatula. Let it dribble off the side. 
  5. Spray a microwave safe plate with cooking spray. Place marshmallows on the plate (I did 5 at a time). Microwave for 30 seconds (watch that the marshmallows do not double in size). 
  6. Spray your fingers with cooking spray. Carefully pull the marshmallows of by the base and set them on top of the cookie icing (not centered). 
  7. Decorate the cookies as you'd like.

Yummy Cake Balls

I celebrated my birthday a few weeks ago and was given a fantastic gift from my sister-in-law. She gave me one of those cake ball makers! It is awesome! This past weekend I made the cake balls for a family gathering and they were a hit. They were so easy and simple to make! I am already planning on making more soon. The great thing is included with the cake ball maker are a few recipes (for things like cookie balls, muffin balls, and cinnamon roll balls) and an injector (to put filling inside the balls). It shows you can use almost any pre-made mix (ex. pancake mixes, cookie mixes, muffin mixes) or you can create your own.


I used a white cake mix to make my cake balls (though you can make them from scratch). I followed the directions on the package. I then placed the batter into each of the wholes on the cake ball maker, closed the lid and let it work it's magic. After 6 minutes (it says most recipes need 5-7 minutes) I opened the lid to check on them and they were perfect. I removed them, using a spoon, to a wire rack to cool. After about 2 minutes they were cool enough to handle. I had purchased a prepackaged bag of raspberry filling from our local grocery store bakery (but you can using canned filling or make your own). I filled it into the injector and put it in the middle. I finished the balls off by rolling them in powdered sugar.

I can't wait to make more. I'm thinking of doing chocolate cake mix and dipping each one halfway in white chocolate almond bark then in fun festive cake sprinkles! Yum!

Homemade Christmas Ornaments

After Christmas sales are the best! Two years ago I found glass clear ornaments on sale for $1.00 a pack there were 9 ornaments in each pack). I picked up three packs for future ornament making. Each year I add 1-2 "new" handmade ornaments to our Christmas tree as well as for gift giving.

Featured are three ornaments. From left to right:

Left: Ornament I made this year for my daughters first Christmas. I used white and light purple paint to make a mitten on the front with the year written using a black paint pen. On the back side I wrote her name using the same paint pen and also used a white paint pen to make snowflakes. I filled the ornament (inside) with pink shimmery filler found at the Dollar Store found in the gift packaging aisle.

Middle: Ornament I made several of as gifts for relatives. This one features Santa (I also made one with a reindeer and another with a snowman). I used red and white paint and outlined with the black paint pen. Using the same technique as the one to the left, I wrote Merry Christmas and the year. I also attached a blue and silver ribbon to the top. I filled this one with silver and white filler crinkled strips.

Right: Vacation ornament. I filled this one with sand from our honeymoon to the beach of Catalina Island in 2007. I wrote on one side "Catalina Island" and the date we were there. On the back side I wrote "Our honeymoon" and our names. I attached a red ribbon to the top. Quick and easy! This is an ornament that after the Christmas season will be kept in our china hutch! Much more pretty than the bottle it was originally in!

Front 

 Back

Another type of ornaments I made as gifts for family a previous year included photographs from over the course of the year. I started with styrofoam cubes (I bought a big 2 inch thick sheet and cut them to the desired size using a knife). I then printed off 5 photographs on white stock paper from the year and glued them onto each side and one on the bottom (depending on where you hang them on the Christmas tree depends on if you desire to have one on the bottom or not). On the one to the left I printed on thick white card stock paper "Merry Christmas. From Tyler and Diana. 2007." I then poked a small hole in the middle and stuck a looped string through hot gluing it to the underside before gluing it to the cube. I added glitter around the edges as well.


Below are ornaments I made with some of my daycare kids. Materials needed: 4 cups flour, 1 cup salt, and 1 1/2 cups warm water. Directions: Preheat oven to 325F. Mix flour and salt well, add water, stirring with a large spoon. Finish mixing with hands. Knead until soft. Roll out on a flat surface about 1/8 inch thick. Cut shapes with cookie cutters. Place on cookie sheets. Using a paperclip or bendable silver wire create a loop and stick in the top of the cookie (see picture below). OR you can with a toothpick poke a hole in the top of the ornament for threading string. Bake at 325F until hard, about 1 hour. Decorate with paint and varnish to preserve.

Monday, November 28, 2011

Gobble Gobble!

Yummy Turkey Rice Krispie Treats

Ingredients:
  • 3 tbsp. butter
  • 1 pkg. (10 oz.) regular marshmallows
  • 6 cups Rice Krispies cereal 
  • 1 pkg. semi-sweet chocolate chips (2 cups) 
  • 1 tbsp. oil
  • 1 1/3 cups candy corn 
  • 2 squares white chocolate almond bark

Directions:
  1. In a large saucepan, melt butter over low heat. Add marshmallows and stir until completely melted. Remove from heat. (Microwave directions: in a microwave-safe bowl, heat butter and marshmallows on high for 3 minutes, stirring after 2 minutes. Stir until smooth).
  2. Add Rice Krispies cereal. Stir until well coated. 
  3. Coat your hands with non-stick cooking spray or butter. (You may need to reapply cooking spray or butter after roll several balls). Divide warm cereal mixture into 24 portions. Using your hands shape each portion into a  ball. Let cool. 
  4. In a microwave-safe bowl, combine the chocolate chips and oil. Microwave on high for 1 to 1 1/2 minutes, stirring every 30 seconds. 
  5. Dip each ball into the chocolate, allowing excess to drip off.
  6. Decorate with candy corn for feathers and beak. Let cool.
  7. Microwave white chocolate bark according to the directions on the package in a small microwave-safe dish. Let cool for about 1 minute. Transfer melted white chocolate to a icing bag with a tip. 
  8. Pipe 2 dots onto the turkeys for eyes. Let stand until firm. 
  9. Store at room temperature in an airtight container.

Saturday, November 26, 2011

Delicious Raspberry-Cranberry Jello

Here is a recipe I am always requested to make around Thanksgiving. I sometimes find that I am making it more than once. Especially to take to potlucks this time of year. It is quick and easy to make. The best part is it can be made the day before and doesn't need heating so makes for an easy potluck dish!

Ingredients:
  • 2 pkg. (3 oz. each) raspberry flavor Jello mix
  • 1 can (20 oz.) crushed pineapple, in juice
  • 1 can (16 oz.) whole cranberry sauce
  • 1 large apple, chopped

Directions:
  1. Drain pineapple, reserving juice. Add enough water to juice to measure 2 1/2 cups; pour into saucepan. Bring to a boil. Pour over gelatin mixes in a large bowl; stir 2 minutes (until completely dissolved)
  2. Stir in pineapple, cranberry sauce, and chopped apple. 
  3. refrigerate 2 1/2 hours, until firm, or overnight.

Festive Acorn Treats

Chocolate Candy Kiss Acorn Treats!

I can't take all the credit for these ones as my cousin found them online and shared them on her Facebook page. I thought they were too cute...so I decided to give them a try. I made an entire package for our Thanksgiving celebrations and only 2 came back home with me. They are quick and fun to do!

Ingredients:
  • 1 pkg. Hershey Kisses, unwrapped
  • 1 pkg. Nutter Butter bites
  • 1 cup mini chocolate chips 

Directions:
  1. Melt some of the mini chocolate chips in the microwave (or you can use chocolate almond bark). This is to be used as your "glue". 
  2. Dip the flat side of the Hershey's kiss into the melted chocolate and press it together with a Nutter Butter bite.
  3. Next, dip the flat side of a mini chocolate chip in the melted chocolate and place it on the top center of the Nutter Butter bite. 
  4. Let them cool so the chocolate hardens.

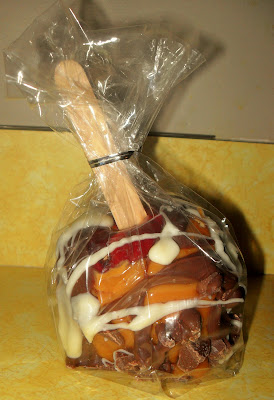
Homemade Gourmet Caramel Apples

Yummy Caramel Apple Gifts!

It has become a tradition for me to make homemade gourmet caramel apples every year for my family and close friends. Each year the amount of caramel apples I make seems to double. It is something I look forward to making the week before Halloween as a yummy fall treat and gift for my loved ones.
Below is the recipe for one of the many types of caramel apples I've made:

Ingredients:
  • 5 Apples (I usually pick Red Delicious, but you can use any you like), cleaned and wiped dry
  • 1 pkg. caramel squares, unwrapped
  • 2 tbsp. milk 
  • 1/2 pkg. chocolate almond bark, melted
  • 3 squares white chocolate almond bark, melted
  • 4 Hershey candy bars, chopped 
  • 5 Popsicle sticks or tongue depressors
  • 5 cellophane gift bags (I have found them at the Dollar Tree, Walmart and Party America)
 
Directions:
  1. Rise and remove any stickers from your apples. Pat dry with a paper towel. Remove stem from the top of the apple. Insert Popsicle stick into the top center of the apple.
  2. Melt caramel squares and milk together on the stove top over medium heat - watch your caramels closely so they do not begin to burn. (I prefer to use my electric fondue pot - but I understand that not everyone has one. You need to keep the caramel continuously warm so microwaving it would not work very well unless you are really fast)
  3. Dip your apple into the caramel mixture. Let excess caramel drip off.
  4. Immediately dip your apple into the chopped Hershey's chocolate bar. Then place onto a chilled cookie tray. 
  5. Immediately place cookies into refrigerate to help cool and set the caramel. After about 30 minutes remove. 
  6. Melt chocolate almond bark in the microwave according to the pkg. directions. Holding the apple side ways and rotating it drizzle the chocolate over the apple using a spoon.
  7. Repeat using the white chocolate bark.
  8. Refrigerate again. After about an hour it will be set enough that you can remove from the refrigerator to place in the cellophane gift bag. You can add pretty curling ribbon a note if you desire. 
Note: Other possible toppings I have used: mini M&M's, chopped almonds, chopped pecans, chopped walnuts, crushed Oreo cookies, cake sprinkles, and/or chopped Snickers bars.

Spooky Graveyard Treat

Yummy Chocolate Pudding Treat for Halloween

Ingredients:
  • 2 pkgs. chocolate pudding mix
  • 4 cups milk 
  • 2-3 cups Oreo cookies, crushed
  • gummy worms
  • 7-10 Keebler chocolate filled cookies
  • 2 pieces of chocolate almond bark, melted 

Directions:
  1. Combine chocolate pudding mix and milk according to the package. Mix for approximately 2 minutes in a medium size bowl. Refrigerate until just before serving.
  2. Melt chocolate almond bark in microwave according to pkg. directions. Put melted chocolate into a zip lock baggie or icing bag with tip. Pipe the letters RIP onto several cookies as tombstones. 
  3. Just before serving. Put Oreo cookie topping down. Then place cookies sticking up into the "dirt" and place as many gummy worms as you desire around the bowl. 
Note: You can serve in individual cups as well. 

"Pumpkin" Cheese Ball

Here is a fun idea for a party!

"Pumpkin" Cheese Ball

Ingredients:
  • 1 pkg. (8 oz.) cream cheese, softened
  • 3 green onions, chopped
  • 2 tbsp. Worcestershire sauce
  • 1 cup shredded cheddar cheese
  • 1 cup gold fish crackers, crushed
  • 3 olives
  • 1 small dill pickle 

Directions:
  1. Combine the cream cheese, shredded cheese, Worcestershire sauce and chopped green onions with a hand mixer in a medium size bowl. 
  2. Chill for 30 minutes.
  3. Roll mixture into a ball. Roll in crushed gold fish crackers (can also use crushed Dorito chips). Cut up olives and use as eyes and mouth. Put small dill pickle in the center of the top as a stem. 
  4. Enjoy!

Tuesday, November 1, 2011

Fun Halloween Cookies - Cookie Eyeballs

Cookie Eyeballs

 
Ingredients:
  • 1 pkg white chocolate almond bark/baking chocolate, chopped
  • 1 box vanilla wafers
  • 1 container white frosting
  • blue liquid food coloring
  • red liquid food coloring
  • chocolate chips 
Directions:
  1. In a microwave, melt white chocolate according to package; stir until smooth. Dip vanilla wafers in melted chocolate; allow access to drip off. Place on waxed paper. Allow chocolate to harden.
  2. For bloodshot eyes, use a toothpick dipped in red food coloring to draw lines from the center of each cookie outward. 
  3. Add blue food coloring to white frosting; stir until blended. Using a piping bag or zip lock bag (cutting a small hole on one of the bottom corners) pipe a small dab of blue frosting in the center of the vanilla wafer. 
  4. Place a chocolate chip in the center.
  5. Set out and enjoy!

Wednesday, October 26, 2011

Mini Clay Terra Cotta Pot Halloween Craft

It seems like you can find clay terra cotta pots just about everywhere these days. I've seen them in craft stores, at garden shops, at Walmart, at the Dollar Tree...and many more places around town. I've also found them on garage sales and at craft fairs.

Here is one of the many craft projects we have done using the mini clay pots: 
These one's we found in packages of three at the local Dollar Tree.
We made the little pot look like candy corn and filled it with a few pieces of small candy as a Halloween gift for our little ones. Adults seem to love these too! I even use some of the pots in my yearly Halloween decorations.

Materials used:
  • Mini clay terra cotta pot
  • Paint brush
  • Yellow paint
  • White paint
  • Painters tape or masking tape (if you want perfect lines)

Recycled Spaghetti Sauce Jar Craft

I am one who likes to reuse and recycle whenever I can. My husband and I try to recycle as much as we can. We have a tote at the top of our stairs near our kitchen were we put all the items in that eventually make their way to the many free recycle center drop offs we have here in town. We like to recycle glass, card board, paper, newspaper, magazines, tin, aluminum, plastic (1-5) containers at these drop off recycle center bins. We also have a composite heap in the backyard behind our shed. And we donate clothing, household goods, etc. to local charities (Veteran's charities, Salvation Army, March of Dimes, etc) and the goodwill. We also shred a lot of paper and keep it in bags to use when we feel like using the fire pit in the back yard to help start a fire on a cold night.

Before getting rid of these items I look at them to figure out if I can reuse them in anyway. Here is how I got the idea for reusing some Ragu spaghetti sauce jars (and one old canning jar).


Materials:
  • 2 Ragu jars
  • 1 canning jar that was missing it's lid
  • Hodge podge (purchased years ago for another craft project I made)
  • Scissors - to cut strips and the faces out 
  • Tissue paper (reused from gift bags I've received - I never throw that stuff out!)
  • Ribbon (out of the dollar bins of left over scrap ribbon)
  • paint brush (to paint the hodge podge onto the jars)

Construction Paper Halloween Crafts

Below are a bunch of Construction Paper craft projects I have done with my little daycare kids!

1. Caramel apples!
Materials:
  • Scissors
  • pencil (to trace)
  • Glue stick
  • Brown construction paper
  • Popcicle stick or tongue depressor
  • Crayons (for the little ones to color their creations)

2. 3-D Jack-O-Lantern
Materials:
  • Scissors
  • Exacto Knife (adult use only) & cutting board
  • Glue stick
  • Green construction paper
  • Orange construction paper
  • Black construction paper

3.Halloween creature puppets

Materials
  • Tongue depressor or popcicle stick
  • Glue stick 
  • pencil (for tracing/outlining)
  • Construction paper colors: green, purple, black, orange, yellow)

4.  Monster mask
Materials:
  • Scissors (to cut)
  • Glue Stick 
  • Pencil (for tracing)
  • Yarn (or string)
  • Hole puncher 
  • Construction paper colors: green, white, black, orange

5.  Bat with hand-print wings
Materials:
  • Scissors (to cut)
  • Glue stick
  • Pencil (for tracing)
  • Your little one's hands (and cooperation)!
  • Construction paper colors: Black, white and purple

Growth Chart!

I had been looking around for a cute growth chart for my daughter to document her height as she gets older and couldn't find one that I liked or would hold up with all my little daycare hands touching it. So I decided with the urging of my friends to make one for her.

1. Select your growth chart material. I used recycled old paneling.
We got a piece of old recycled paneling which had come from my brothers new house while he is in the process of remodeling it. He didn't need it anymore and we couldn't bear to have it just thrown out so we got a hold of a few pieces to have on hand "just in case". My husband cut the paneling to the length and width that I desired.

2. Prime the growth chart material, if desired or needed.  
I then painted the paneling white (as a primer) and waited for it to dry. It took about 1/2 a day before I painted my base coat on it.

3. Select your base coat of paint and get to painting. 
I then chose my base paint (a light blue) to paint the background. Again I waited a few hours, until it was dry, to paint on top of it. I painted 3 coats of this paint onto the paneling. You can paint however many coats you desire.

4. Make your markings for the growth chart.
Using a yard stick I made the ruler markings on the growth chart. I found it much easier to use a paint pen (purchased at Michael's Craft Store) to do this part. Though if you have a steady hand that would work well too. I just lacked the patience to do that part :)

5. Select your designs.
I looked at several different designs and patterns on the internet before deciding on using different size circles using four different colors.  I started by locating some left over clear plastic cover type sheets I had kept again "just in case". I then walked around my house and located three different size objects that were circles to trace around. I used an tubberware lid, a candle base, and a glass to trace around. I used a permanent maker to do the tracing. Then I used an exacto knife and cutting board to cut the circle out. I set the circles aside as I was going to use the outer part as a stencil.

6. Make your designs.
I used painters tape (as not to peel up the base coat) to tape down the stencils where I desired. I then used a paint brush with the desired paint to paint over the stencils. I waited again for the paint to dry before painting another coat of paint over the top.

7. Add embellishments.
When everything was dry I added my embellishments. For this project I added some 3 dimensional stickers that I had received in my Christmas stocking last year. They were originally intended for scrapbooking but thought they would work well for this. I had also purchased a while back in the Target dollar bins glittery letters in silver, gold and red. Not sure what I was going to use them for at the time, I knew I would find something to put them. Here was that time. I used the silver letters to put Audrey's name on the growth chart.  

8. Stand back and enjoy your hard work for years to come!