Sometimes when life gets messy you've got to spread around a little fairy dust to make it through the day!

Wednesday, December 28, 2011

Thumbprint Cookies


Ingredients:
  • 1 1/2 cups unsalted butter, softened
  • 1 cup sugar
  • 1 tsp. vanilla extract
  • 3 1/2 cups all-purpose flour
  • 1/2 tsp. salt
  • Desired jelly (I used strawberry, apricot,  peach, and blackberry)

Directions
  1. Preheat the oven to 350F degrees.
  2. In a large bowl, cream the butter and sugar and stir in the vanilla extract.
  3. In a medium-sized bowl, mix the flour and salt. Combine the flour mixture and the butter mixture until the dough is crumbly but holds together when pinched.
  4. Take a walnut-sized piece of dough in one hand. With the thumb of the other hand, gently knead it three times
  5. Roll it into a ball and place on an ungreased cookie sheet. With your knuckle or thumb, press a well in the center and fill with 1/2 teaspoon of jelly. 
  6. Bake for 10 to 15 minutes.

Festive Chocolate Cake Balls


Ingredients:
  • 1 box Chocolate Cake mix (prepared according to the directions on the package)
  • 1/2 can pie filling (I used raspberry filling)
  • 1/2 pkg. white chocolate almond bark 
  • Festive cake sprinkles 
Directions
  1. Make the cake mix according to the directions on the package. 
  2. Using an ice cream scoop fill the cake ball maker slots to the top. Close the lid and let them bake for approx. 6 minutes. Remove them immediately to a cooling rack. Repeat until the cake batter is all gone.
  3. Meanwhile, fill a quart-size bag with the pie filling (or use the injector included with the cake ball maker). Once the cake balls are cool enough to handle, pipe the pie filling into each of the cake balls. 
  4. Using a microwave-safe bowl, melt the white chocolate bark. Dip just the tops of the cake ball into the melted chocolate. Immediately sprinkle with the sprinkles! 
  5. Let cool and enjoy!!

Chocolate Chip Cookies


Ingredients:
  • ¾ cup unsalted butter, softened
  • ¾ cup brown sugar
  • ¼ cup granulated sugar
  • 1 egg
  • 2 tsp. vanilla extract
  • 2 cups flour
  • 2 tsp. cornstarch
  • 1 tsp. baking soda
  • ½ tsp. salt
Directions:
  1. Preheat oven to 350F.
  2. In the bowl of a stand mixer fitted with a paddle attachment, cream together butter and sugars until fluffy and light in color. Add egg and vanilla and blend in.
  3. Mix in flour, cornstarch, baking soda and salt. Stir in chocolate chunks.
  4. Using a standard-sized cookie scoop or tablespoon, drop dough onto a prepared baking sheet.  Bake for 8-10 minutes, until barely golden brown around the edges.  (The tops will not brown, but do NOT cook longer than ten minutes.)
  5. Let cool, on the sheet, on a wire rack for five minutes.  
  6. Remove from baking sheet and let cool completely.  

Santa Hats


Ingredients:
  • 2 egg whites, at room temperature
  • 1/2 tsp. cream of tarter
  • 1/4 tsp. vanilla extract
  • 1/2 cup sugar
  • Red colored sugar 
Directions:
  1. Preheat the oven to 200F. 
  2. With an electric mixer, beat the egg whites until soft peaks start to form. Beating all the while add the cream of tarter and vanilla extract. Then slowly add the 1/2 cup of sugar. Continue to beat until the peaks stiffen. 
  3. Spoon the meringue into a quart-size plastic bag. Snip off the corner and pipe 2 dozen 1 1/2 inch tall Santa hat triangles onto a parchment lined baking sheet. Note: you should have 1/4 of the meringue left. 
  4. Sprinkle the triangles with the red sugar. Then use the remaining meringue to give each one a pom pom and trim. 
  5. Bake the hats for 1 hour and 20 minutes. Turn off the oven and leave the hats in it for an hour to crisp before removing. 
Here is a closer look:

Note: I do not recommend putting these on an enclosed cookie tray with the other cookies. I found that they absorb the moisture from the other cookies and crumbled. But the hats stayed in their original shape when stored in an airtight container with just these other Santa hats.

Candy Cane Cookies


Makes about 23

Ingredients:
  • 3/4 cup butter, softened
  • 1 cup sugar
  • 1 egg
  • 1 tsp. peppermint extract
  • 1/2 tsp. vanilla extract
  • 2 1/4 cups flour
  • Red food coloring

Directions:
  1. Preheat oven to 375F. 
  2. In a large bowl, cream the butter and sugar. 
  3. Add the egg and beat well. 
  4. Stir in the peppermint and vanilla extracts. 
  5. Gradually mix in the flour. 
  6. Divide the dough in half. Color one half with red food coloring and leave the other half plain. 
  7. Roll out a tablespoon of red dough and a tablespoon of plain dough until they are each 6-8 inches long. Twist then into a candy cane, pinching the ends. Repeat.
  8. Bake on an ungreased cookie sheet for 8-10 minutes.

Peanut Butter Chocolate Treats


Ingredients:
  • An even number of Ritz Crackers (I used 28 crackers but you can make as many as you desire)
  • Peanut Butter 
  • 1/2 pkg. chocolate almond bark
Directions:
  1. Take a Ritz cracker and smother with glob of peanut butter (can use chunky or smooth). Top with a second Ritz cracker - it will look like a sandwich. Repeat with remainder of crackers. Set aside.
  2. In a microwave-safe bowl, melt according to the directions on the package the chocolate almond bark. Remove from microwave.
  3. Dip the prepared Ritz peanut butter sandwiches into the chocolate. 
  4. Set on a wax paper lined cookie sheet to cool and harden. 
  5. Store in an airtight container.

Press Cookies

Holly Wreaths:

While looking around my parents pantry/storage area I came across a Mirro Press Cookie maker. Since it wasn't getting much use at their house, I asked if I could take it home and try it out. For Christmas this year I gave it a try. I used the star press plate to make some festive holiday cookies that I included on my annual cookie tray I give to relatives and close friends every year.

Here is how they turned out:


Recipe:

Ingredients:
  • 1/2 cup butter
  • 1 1/2 oz. cream cheese, softened
  • 1/4 cup sugar
  • 1/2 tsp. vanilla extract
  • 1 cup flour 
  • I added 1/2 tsp. peppermint extract as well and a few drops of green food coloring
Directions:
  1. Cream the butter and cream cheese. Add the sugar and cream well. Then add the vanilla extract (and/or peppermint extract and/or food coloring).
  2. Slowly add the flour. Mix well. 
  3. Fill a cookie press. Form cookies on an ungreased cookie sheet (I used the star press Mirro plate I held the press upright and turn it on the cookie sheet 1/4 turn).
  4. Bake in a 375F for 8-10 minutes.

Winter Crafts for Kids

Winter time means colder weather and with colder weather means more staying in doors to keep warm. What to do with all that extra time with little kiddos? At my daycare we find lots of extra crafts to do. Here are a few we've made this year:

Embellished Mitten Craft

Materials:
  • Construction paper (colors of your choosing; we chose yellow, red, purple and blue)
  • Printed recent photograph (can be in color or black and white)
  • Lid of a jar (used to trace the circle around the desired photograph)
  • Pencil (used to trace the lid)
  • Scissors 
  • embellishments (ex. sequence, glitter, fuzzy pompoms, etc)
  • glue


Construction Paper Santa Hand 


Materials:
  • Construction paper (red, pink, black, green, white)
  • Cotton balls (used for the puff on the end of the Santa hat)
  • Template (I made one using an old manila file folder)
  • Pencil (to trace templates and child's hand)
  • Scissors 
  • Glue 
  • Note: you can also use googly eyes instead of construction paper for the Santa eyes 
  • Child's hand 

How to display all this wonderful artwork??

Decorated Magnetic Clothes Pins:

Materials:
  • Clothes pins 
  • Magnetic strip (cut into smaller strips)
  • Glue gun & glue (used to glue magnetic strip onto the back of the clothes pin)
  • Pretty scrapbook paper 
  • Pencil (used to trace around the clothes pin front onto the back of the scrapbook paper)
  • Scissors (used to cut the magnetic strip and the scrapbook paper)
  • Mod Podge (used to glue the scrapbook paper onto the front of the clothes pin)
  • Paint brush

Monday, December 12, 2011

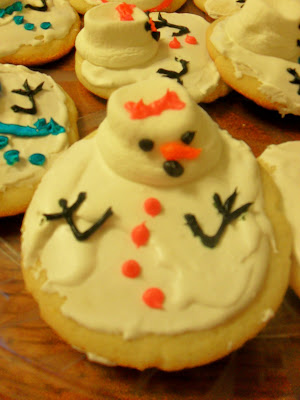
Melted Snowman Cookies

I recently become addicted, like so many others, to a website called pinternet! It gives you all sorts of ideas of DIY projects and craft ideas as well as recipes. I found these cute melted snowman cookies and decided to give them a try for a family gathering we attended this weekend. I had fun making them and they are adorable!


To make 10 cookies:

Ingredients:
  • 1 pkg. Betty Crocker Sugar Cookie Mix (and ingredients on pkg)
  • 10 large marshmallows
  • Decorating icing tubes (black, orange, and other desired colors for buttons, scarves, bows, etc)
  • Royal Icing ingredients: 1 egg white, 1 1/2 cups powdered sugar, 1 tsp. lemon juice (makes 2 cups)
Directions:
  1.  Mix cookie mix according to pkg directions. Grab a chuck (about golf ball size) and squish it down using the palm of your hand until its about 1/4 inch thick. The lumpier or misshaped the better! Bake according to the directions on the pkg. 
  2. Remove to a wire rack and let cool.
  3. Make the royal icing: combine the egg white and sugar, whip with an electric mixer for 5 minutes. Add the lemon juice, mix again for 3 minutes. 
  4. Slather the royal icing over the top of the cookie. Spread it around with the back of a spoon or rubber spatula. Let it dribble off the side. 
  5. Spray a microwave safe plate with cooking spray. Place marshmallows on the plate (I did 5 at a time). Microwave for 30 seconds (watch that the marshmallows do not double in size). 
  6. Spray your fingers with cooking spray. Carefully pull the marshmallows of by the base and set them on top of the cookie icing (not centered). 
  7. Decorate the cookies as you'd like.

Yummy Cake Balls

I celebrated my birthday a few weeks ago and was given a fantastic gift from my sister-in-law. She gave me one of those cake ball makers! It is awesome! This past weekend I made the cake balls for a family gathering and they were a hit. They were so easy and simple to make! I am already planning on making more soon. The great thing is included with the cake ball maker are a few recipes (for things like cookie balls, muffin balls, and cinnamon roll balls) and an injector (to put filling inside the balls). It shows you can use almost any pre-made mix (ex. pancake mixes, cookie mixes, muffin mixes) or you can create your own.


I used a white cake mix to make my cake balls (though you can make them from scratch). I followed the directions on the package. I then placed the batter into each of the wholes on the cake ball maker, closed the lid and let it work it's magic. After 6 minutes (it says most recipes need 5-7 minutes) I opened the lid to check on them and they were perfect. I removed them, using a spoon, to a wire rack to cool. After about 2 minutes they were cool enough to handle. I had purchased a prepackaged bag of raspberry filling from our local grocery store bakery (but you can using canned filling or make your own). I filled it into the injector and put it in the middle. I finished the balls off by rolling them in powdered sugar.

I can't wait to make more. I'm thinking of doing chocolate cake mix and dipping each one halfway in white chocolate almond bark then in fun festive cake sprinkles! Yum!

Homemade Christmas Ornaments

After Christmas sales are the best! Two years ago I found glass clear ornaments on sale for $1.00 a pack there were 9 ornaments in each pack). I picked up three packs for future ornament making. Each year I add 1-2 "new" handmade ornaments to our Christmas tree as well as for gift giving.

Featured are three ornaments. From left to right:

Left: Ornament I made this year for my daughters first Christmas. I used white and light purple paint to make a mitten on the front with the year written using a black paint pen. On the back side I wrote her name using the same paint pen and also used a white paint pen to make snowflakes. I filled the ornament (inside) with pink shimmery filler found at the Dollar Store found in the gift packaging aisle.

Middle: Ornament I made several of as gifts for relatives. This one features Santa (I also made one with a reindeer and another with a snowman). I used red and white paint and outlined with the black paint pen. Using the same technique as the one to the left, I wrote Merry Christmas and the year. I also attached a blue and silver ribbon to the top. I filled this one with silver and white filler crinkled strips.

Right: Vacation ornament. I filled this one with sand from our honeymoon to the beach of Catalina Island in 2007. I wrote on one side "Catalina Island" and the date we were there. On the back side I wrote "Our honeymoon" and our names. I attached a red ribbon to the top. Quick and easy! This is an ornament that after the Christmas season will be kept in our china hutch! Much more pretty than the bottle it was originally in!

Front 

 Back

Another type of ornaments I made as gifts for family a previous year included photographs from over the course of the year. I started with styrofoam cubes (I bought a big 2 inch thick sheet and cut them to the desired size using a knife). I then printed off 5 photographs on white stock paper from the year and glued them onto each side and one on the bottom (depending on where you hang them on the Christmas tree depends on if you desire to have one on the bottom or not). On the one to the left I printed on thick white card stock paper "Merry Christmas. From Tyler and Diana. 2007." I then poked a small hole in the middle and stuck a looped string through hot gluing it to the underside before gluing it to the cube. I added glitter around the edges as well.


Below are ornaments I made with some of my daycare kids. Materials needed: 4 cups flour, 1 cup salt, and 1 1/2 cups warm water. Directions: Preheat oven to 325F. Mix flour and salt well, add water, stirring with a large spoon. Finish mixing with hands. Knead until soft. Roll out on a flat surface about 1/8 inch thick. Cut shapes with cookie cutters. Place on cookie sheets. Using a paperclip or bendable silver wire create a loop and stick in the top of the cookie (see picture below). OR you can with a toothpick poke a hole in the top of the ornament for threading string. Bake at 325F until hard, about 1 hour. Decorate with paint and varnish to preserve.